Showing posts with label you can do it. Show all posts

Monday, April 22, 2024

garden to do list - spring 2024

 So much to do, so little time.  I have one more weekend left before the burn ban goes into effect, and then I can turn my attention to the garden.  Spring is almost the only time I have flowers blooming, thanks to my seemingly epic amounts of shade, and clay soil.  I am determined to do something about that this year.

Here are my plans...some of these will be for the fall or next spring, after we're finished with the back hoe work, but here is the wish list:

  • impatiens in the window boxes
  • flowers in pots on the porch
  • bring out the houseplants to the porch
  • small herb garden by the back door
  • cutting garden - zinnias
  • fertilize azaleas & rhododendron
  • fertilize boxwoods 
  • another raised bed
  • replace camelia
  • replace gardenia
  • move peony
  • new peony
  • move Cramoisi Superieur rose
  • butterfly bush?
  • design & plant new hydrangeas and possibly boxwood
  • Clean out back garden
  • treat all hemlocks
  • creeping phlox
  • transplant some rock iris
  • transplant some hosta
  • make garden spaces to the right side of wooded path

pond project - recap

 Slow and steady wins the race.  ;)  

October 2022 
Where we started
Where we are 

December 2022
Where we started
     
       
October 2022

December 2022

 
Where we started

October 2022

Where we started
October 2022
                             
Where we started

Where we started 
October 2022

Wednesday, December 28, 2022

pond project - december 2022 adventures

I have always had big plans for my view of the pond.  My house sits up  on a small hill, and the deep southern porch is one of my favorite features.  When I moved in, there was no front yard, and the hill had grown up to the point you couldn't see the pond from my yard.  Over the past 11 (!!!) years, I have done some work to improve the view, but it turned out that my Dad's plans were even bigger....and dare I say it, more impactful.

Dad's plans called for heavy machinery, and he surprised me by bringing "Sally Sue" to my house.  Sally Sue is a combo Backhoe and Bulldozer, and I like to say that she built interstates in a previous life.  For the past few weeks, Sally Sue has been working and living at my house.  She has made easy work of removing dead trees from the pond and clearing around both the pond & my driveway.  She has dug new drainage ditches around the pond and fixed some major potholes in my driveway.  The brush piles are growing, and Sally Sue will be a big help when we burn.  


Blogger is a pain, but switching to a new platform is harder.  Captions would read: Before view from the porch, and after some clearing out by hand.
After working with Sally Sue

I still have quite a to do list for Sally Sue before she leaves... clearing more around the pond to improve the view, pre-digging some holes so I can amend the soil and plant hydrangeas this spring, transplanting magnolias & native bushes, planting some evergreens, and taking down some dead Oaks from around the property.  It's a lot of work, but very much worth it! 


Tuesday, March 8, 2016

spring cleaning 2016 - part 1

Look at my shed.  It's so pretty.  It has a fresh coat of paint, and a pretty wreath up for Christmas 2014.


So cute from the outside right? Inside is another story.  I'm not even going to show you the inside, it's that bad.  Inside are the last unpacked boxes from my move (just a few years ago), an unplugged deep freezer (no outlets inside yet), a stained glass workbench (and corresponding tools etc), yard stuff (this is actually organized), assorted scrap wood, my recycling, and furniture & boxes I've been storing for my sister.

It's a mess, but a mess that's easily hidden from public view.  This weekend spring cleaning started with my shed.  I sorted my recycling, broke down all the cardboard boxes, stacked the lumber, and started the process of making it a usable space.


The goal is for my sister to move her stuff out, so I can put my boxes, and my Christmas decorations, upstairs.  (This will free up some much needed space in my spare bedroom.)  Then I'll be able to run power so that I can set up a stained glass workstation, have a functioning deep freezer, and be able to plug in a lawnmower.  The building has two light bulbs, so adding outlets shouldn't be a super huge project, but I want to put my stained glass workstation on a different breaker.  (That may be phase 2.)

I may even buy matching trash cans to sort my recycling in.  Crazy talk, I know.

Wednesday, February 5, 2014

kitchen progress - step 1 complete

Ladies and gentlemen, I now have a functioning ice maker.  I feel like an idiot for not fixing it sooner, but oh well.  I HAVE AN ICE MAKER!

The first part of my kitchen project is complete.  In addition to my amazing functioning ice maker I have a new pull out, under sink trash can, a vintage-inspired bread box for my spices, freshly painted cabinets, and a valance and some pillows & a valance made from the Chattanooga Toile.

Chattanooga Toile y'all

The biggest part of step one was the cabinets.  I thought the hardest part of this job was going to be painting the insides of the top cabinets.  It was time consuming, but not as time consuming as trying to paint both sides of my 1700kazillion cabinet doors.  Even with all 3 leaves in my dining room table, I only had room for 4 large doors and 3 skinny doors at a time.  It takes a lot of time for paint to dry when it's 12 degrees outside.  Even my dehumidifier was like, sorry, I'm not going to be able to help you.  None of the work was hard, per se, but waiting for paint to dry on the doors was the most time consuming part.  One coat of primer, and two coats of paint on both sides of the doors = a lot of time, when you can only do a handful of doors at a time. What I thought was going to take a week, ended up taking the better part of 3 weekends, lesson learned, but it was worth it!

Before
Ta-Da!


I'd say this is an improvement.  I love my little bread box, and my milk glass lamps from Chattanooga Auction House are perfect. (More about the Auction House)  I had debated changing the knobs on the cabinet doors, but the contrast has grown on me, and I really do like the painted flowers, and mirrored outline. 


The next part of the kitchen project is the wall opposite my kitchen sink.  This is where I'm going to put floor-to-ceiling built in cabinets.  The pictures below show where we've been and where we're going.  There is an IKEA run in my future, and another weekend or two of working in my kitchen.


Side note:
I did learn a trick to painting around hinges.  Use two pieces of tape, and fold the edges like you're wrapping a present so that things stick and lay flat.  Wrap the flat part first, and the round part second.  Simple, and effective.  I was quite proud of myself for figuring that out.

Tuesday, January 14, 2014

progress

I started 2014 with a few goals for my house.  Specifically my kitchen.  I'm happy to say that I got the ball rolling this weekend.

When I first moved in to my house, my kitchen was a beige-y flesh tone.  The walls, the cabinets, the trim -  everything thing looked like dried out calamine lotion.   Good for hiding dirt (maybe??), but less than appealing.  The first thing I did before I moved in was paint the trim white and the walls an almost white yellow.

What a difference some paint makes.


Painting the walls was a huge improvement, and I left the cabinets for another day.  This past Saturday was that day.  I have never painted cabinets, but believe it or not, it wasn't that bad.  I ended up painting more than I planned, so I'm happy.  I'm just lacking the final coat of paint on the doors to finish the first cabinet!


Before - calamine cabinets.
So far.

The ultimate January goal is to paint cabinets, and install a pull-out trash can.  I'll have to move my refrigerator to paint, and the bonus project is to get some new line and connect my ice maker.  Do you know how long it's been since I've had a working ice maker???  At least 4 apartments, and almost 5 years ago.  I CAN'T WAIT!  It's going to be like having a new kitchen.

The February goal is to install floor to ceiling bookcases on the wall opposite my sink.  I took some measurements this weekend, and the bookcases I picked out from Ikea are going to work.  I found a nice tutorial online, so I'm going to add molding to make the bookcases look more like built-ins..  This is a rough sketch of what the wall will look like when I'm done.

Like I said, rough sketch.

This is where is pretty much what it looks like normally (with some curtains), so again, this will be a big improvement.

Photo taken a month after I moved in.

Thursday, October 31, 2013

my great grandmother's day lilies

I feel like my Chattanooga readers might be getting sick of my garden posts, but gardening in Chattanooga is part of living in Chattanooga, and I hope you can learn a little bit from me about what works (and what doesn't work) this area.

The plants that have done the best in my yard are by far the day lilies.  These aren't special hybridized day lilies, they are what I would call native ditch lilies.  These are the orange day lilies that you see along the roadside in the summer.  They can survive our hot summers, our sometimes cold winters, our wet years, and our droughts.  They prefer sun, but tolerate my shady front yard.  They even multiply on their own, and fill in so you don't have to weed.  All without any extra attention from us.

 Summer 2012

No one can remember when this day lily bed was planted, but it goes back as far as my uncle can remember, so easily somewhere in the 30 to 50 year range.  If my great grandmother was anything like my grandmother, these day lilies were actually collected from the ditches near her house over time. (My grandmother did the same thing with rocks.)  After my great-grandmother died, no one touched the day lilies.  Trees grew up around them, and they just kept growing and multiplying.  They bloomed when the house was vacant, and when the first tenants began renting the house.

Summer 2012

When I moved in, two years ago, they were the plants I counted on my first summer. This year they bloomed, but didn't bloom well.  The reason was this: they were beyond over crowded.

Summer 2013

So after who knows how many years of growing on their own, I decided this fall was time to divide the day lilies.  I was nervous before we started, because about 3 weeks earlier, the day lily bed was mowed over by a rogue landscaping crew.  At first I was upset (they mowed down my wildflowers right before they bloomed), but with the day lilies, I think it worked to my advantage.  When they were transplanted, the leaves were shorter, therefor less energy is required to keep the plants alive.

Here is process for transplanting day lilies:
  1. Dig out a clump with a shovel, and shake out the dirt.  The roots are fairly shallow, so you don't have to go down too far, but a shovel works better than  trowel.
  2. With the dirt out of the way, the bulbs can be pulled apart by hand.  If that is too much trouble, you can take a sharp knife, and cut the clump into smaller sections.  You're not going to kill them.  Promise.
  3. (optional)  Amend the soil.  My soil was pretty spent, so I added mushroom compost and soil conditioner to the bed so that the mixture was 1/3 by volume soil, mushroom compost, and soil conditioner.
  4. Replant, leaving 10-12 inches between the plants or small clusters of plants.  The leaves grow up, and then mound down, so you won't see the space in between.  
  5. Water.  Give everything a good soak so that the roots can establish themselves.  Continue to water carefully until estabolished.
  6. (optional) Mulch. They will survive without it, but whether its traditional mulch, leaves, or grass clippings, mulch helps retain moisture, and keeps out the weeds.
Spacing small clumps of day lilies about a full hand's width apart, I ended up putting less than a quarter of the day lilies back into the day lily bed.  All of the plants were immediately happier than they had been before.  They perked right up, and since it is fall, I only worried about keeping them watered for about 2 weeks.  This past weekend I mulched the bed, and we are now good to go.  

Fall 2013

You may be asking what I did with the rest of the day lilies?? I created another bed at the edge of the woods, put some near my roses, and gave about 50 plants to a co-worker.  This weekend we are celebrating my grandmother's 90th birthday, and I am giving some away as favors.  I have about 250 plants left, and they will be potted up or kept in plastic bags while they are dormant this winter.  Hopefully I can find happy homes for them next spring.  If you're interested, let me know!

Fall 2013

Friday, October 25, 2013

shade garden

One day, maybe, I'll come up with creative names for my gardens.  Today is not that day.  Today the best name I can come up with for the area that my mom and I have been working on is "Shade Garden".  It's a horrible name.  All of my gardens are in the shade.  "Shade Garden" in no way distinguishes this part of my yard from any other.  The important part is not the name, but the fact that it's finished.


Before we get any further, let's talk about hydrangeas, and specifically Oak Leaf Hydrangeas.  I have a love hate relationship with hydrangeas.  When I moved into my house, I decided that I wanted to include as many 'old-fashioned' plants as possible.  Hydrangeas qualify. They've been around forever.  They're shrubs, so they're good habitats for critters, and I do love nature.  They also bloom, which is plus when you're dealing with shade, and they make good cut flowers.  That's a lot of positives. This is what I don't like:
  1. Hydrangeas are trendy right now, and I'm not the kind of person who follows trends. 
  2. Blue hydrangeas make me think of trailer parks.  (You can say that when you grew up near trailer parks.  And I'm not the only one who things so, so don't judge me alone.) There's nothing wrong with trailer parks, but they've never been my aspiration or inspiration.  
  3. I hate their foliage almost as much as I hate iris foliage.  Plants only bloom part of the year, so for me, what you're looking at most of the time is important.  When Oak Leaf Hydrangeas aren't blooming, they look like they're trying to be trees, but their leaves got fat instead, and they grew out instead of up.

So you can guess what the first plants to go into the "Shade Garden" were.  Oak Leaf Hydrangeas.  They grow very well here, and as such, I have access to almost an unlimited supply of free Oak Leaf Hydrangeas. Free always wins.

OK, back to the story of the newly named "Shade Garden."

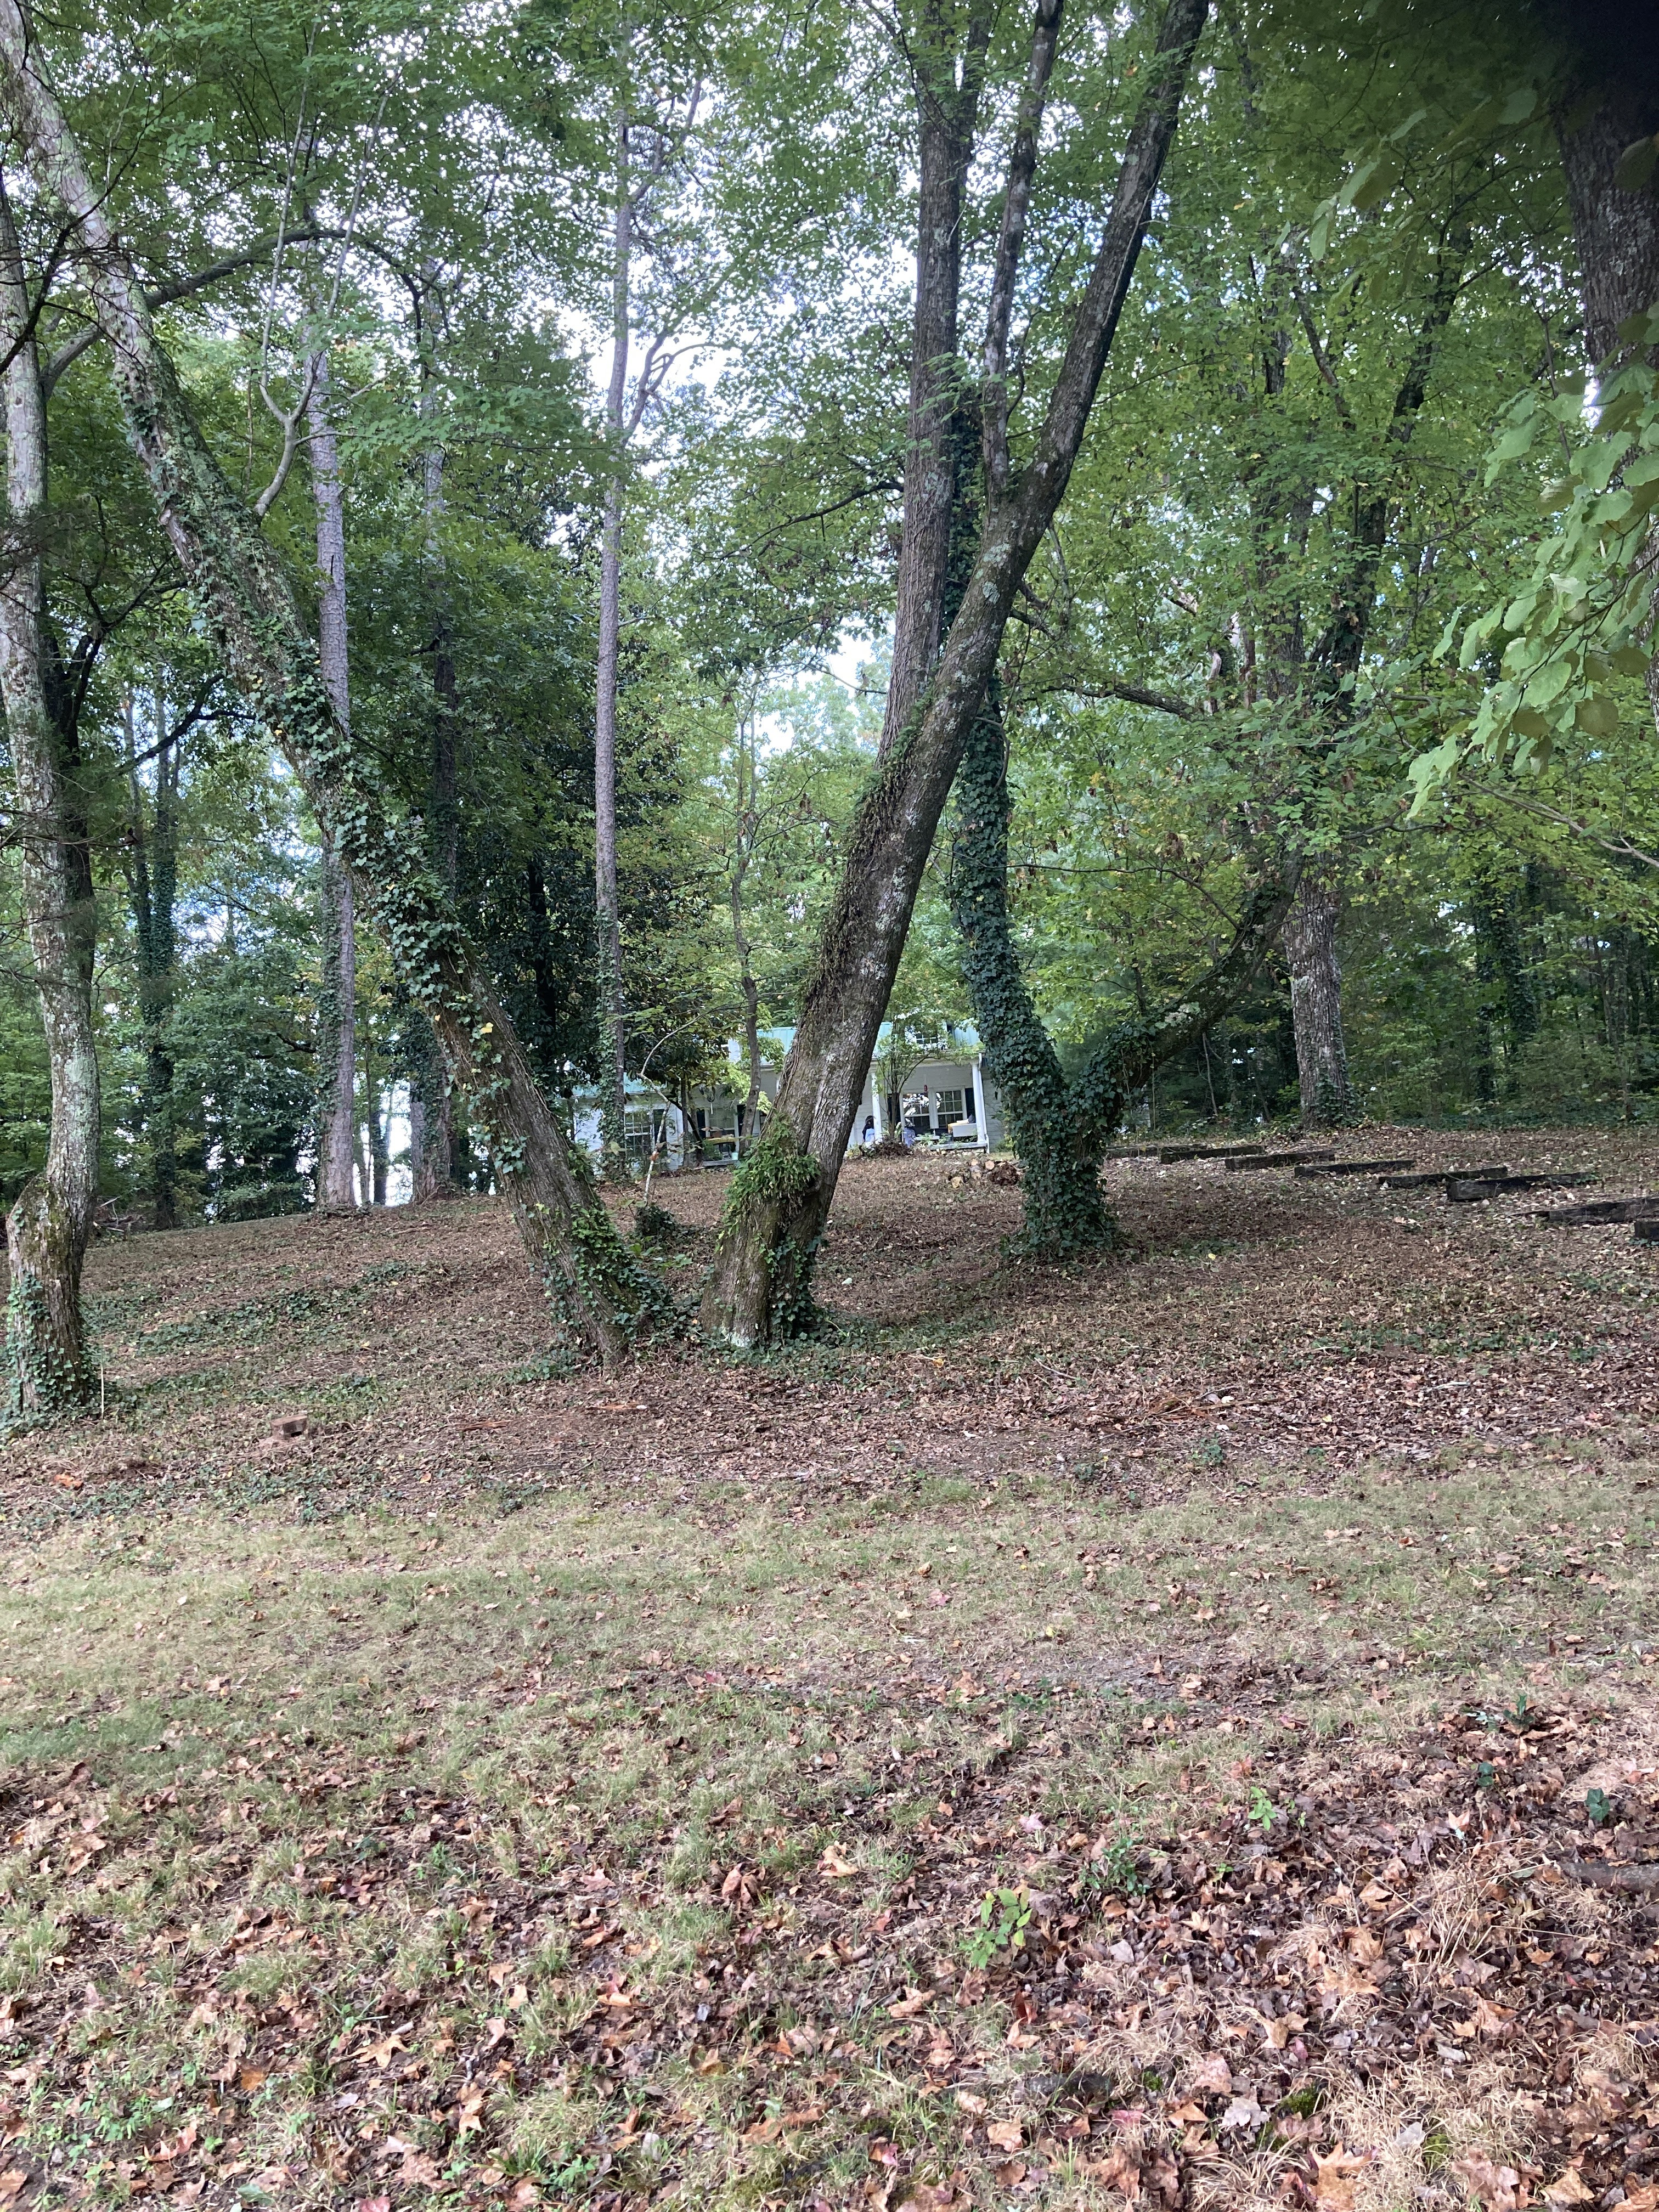
So last summer we got out the Round-Up, and went to war with the ivy behind my shed.  It was a hot and dry summer, and after two applications ivy was gone.  Last fall we blew leaves into this area to help with the mulch, and the ivy stayed away. Hallelujah! There was an azalea, a holly, some huckleberries, and a few Hearts-A-Burstin in this spot, so the foundation of a garden was there, it just didn't look like anything yet.  It was a mess, but I called it natural and didn't loose any sleep over it.

Fast forward to about a month ago.  My house was finally painted, and it was time to make my yard as spiffy as my house.  The area behind my freshly painted shed needed to go from 'area where the ivy used to be' to some type of garden.  'Garden' being an area with things that bloom and laid out in a way that you can see said blooms.

I'm a big fan of plants that have grown with little or no attention over the course of the past 20 years, so I decided to keep everything that was growing in this area, but move it around so that the tall things were in the back, and the short things in the front. I also brought in 2 baby Oak Leaf Hydrangeas from my parent's house, and a mix of hostas from my house and my parent's house to add blooms.  It was a very sophisticated plan.

The end result is that I have something that resembles a garden.


Or should I say, looks like a garden after I label everything, and you don't have to play Where's Waldo to find the plants.


Since I forgot to take a before picture, imagine all the plants clustered together around the azalea and the small tree up front. We moved everything back and out, with the exception of the azalea. (I was scared I would kill if we tried to dig it up.)  Now that we're finished, you can actually see the azalea, and since the holly is no longer on top of it, both plants should do better.  The hydrangeas have plenty of room to fill out, and the Hearts-A-Bursting & huckleberries should look nice in swaths in the back.  You can see everything, and it still looks natural.  In the spring it should look like a garden.  Mission accomplished.

This post has close ups of the plants we moved.

Tuesday, July 17, 2012

bored or resourceful...you decide

I can't tell whether I'm just bored, or being resourceful, but either way I have started canning. I borrowed my mom's canning equipment, and I'm starting to take advantage of all the awesomeness that the farmers markets and fruit stands in Chattanooga have to offer.  The good news is, that while I have started small, it's really not that hard.

I started off very safe, with a "I think this should work" recipe in small quantities, and it went well enough that I'm about to enter the 'go big or go home' phase.  I made just over 1.5 pints of strawberry/peach preserves, and did one pint size jar of pickled onions.  I really like having the onions around to put on salads, or toss in with green beans.

The preserves taste great.  I didn't add anything to help it gel up, so it's a little runny compared to traditional preserves, but I just couldn't add any more sugar.  I'd love to know if you 'can', and what your favorite recipes are.  Please let me know in the comments!

If you're interested, here are the recipes I started with:

Strawberry/Peach Preserves:
 Ingredients:
1 medium package of strawberries
1 large basket of peaches
1 lemon, juiced (or concentrate)
2 oranges juiced (or concentrate)
2 cups of sugar

Yield:1.75 pints

Instructions:
Dice your fruit and place in a saucepan with lemon and orange juice.  Bring to Boil over medium heat.  Drain, and set fruit aside.  Bring the liquid back to a boil and slowly add the sugar so it fully dissolved.  Reduce heat to a rolling boil.  Cook down the liquid for at least 20 minutes or until the foam has dissipated, stirring occasionally to prevent the sugar from burning.  When you are happy with the consistency, add the fruit, bring back to a boil, then fill your jars.

Pickled Onions

Ingredients:
2 medium videlia onions, thinly sliced
* 3 parts vinegar, 1 part water mixture
3 gloves garlic, chopped
Yield: 1 Pint

Instructions:
Confession: since I was only making 1 jar I cheated on my measurements. I stuffed the onions in the jar, and then added the vinegar & water until the jar was completely full.  
In a saucepan, bring vinegar water mixture to a boil.  Add the onions and garlic, bring back to a boil.  Then fill your jar, leaving 1/2 an inch at the top.  I want my onions to stay crisp, so they don't have to boil long, just enough to kill any bacteria that was on the outside layer of the onion.

Canning:
The principles behind canning are sterilize your jars and your lids, fill your jars with hot (boiling) contents leaving a little room at the top for the air to collect, then process in boiling water so the air escapes, and you create a vacuum seal as everything cools.

How exactly you process what you're canning varies based on what it is, and rather than go into the details I'm going to share this link from Ball.

Again, let me know if you're a canner, and what you preserve!

Thursday, June 21, 2012

a promise to myself

This weekend I will work in the garden.  I will take all of the plants I have out of their pots and put them in the ground, even if it may not be in their permanent home.  I weekend I will mulch as much as I can.  This weekend I will fill my extra containers with annuals that will make me smile when I get home.  This weekend I will drink wine with friends.  This weekend I will relax and get over my cold.  This weekend I will get stuff done.

I promise.

Sunday, May 6, 2012

A little garden advice

I am not a gardening expert.  I do not have acres of corn, and I am not responsible for any of the homes on your local garden tour. (yet) I am just a girl who played in her mom's garden and has grown a thing or two in pots.   I'm sharing a little of what I consider to be gardening advice, well, just because I can.  If you agree, disagree, or think I've left something out please leave a comment and maybe we can all learn something, and have pretty pretty outside spaces this summer.
  
Two words - drought tolerant.
  • These words on a plant tag are a southern gardeners best friend. Even though I'm still getting to know my yard (in all of it's shady glory) I know that without a doubt it is going to get hot this summer, and there will come a point when I won't water as much as I should. Solution: drought tolerant plants.
  • Garden newbies, friends with 'black thumbs', when you see this on a plant tag, seriously consider putting it in your cart. It's one of the secrets to not killing plants.
  • These are especially good words for container gardening.
Mulch
  • Organic (ie not rock) mulch is great because it does 4 things:
    • Holds moisture so you don't have to water so much
    • Keeps the weeds out 
    • Breaks down and feeds the soil
    • Looks all neat and pretty without have to fill every space with plants
Read the plant tag
  • All of the information on the plant tag is important.  It will tell you what conditions the plant needs to survive.   No matter how hard you try, the plant has already made up its mind about what it needs, and if you ignore what it wants, the plant probably won't make it.
  • It's not a bad idea to keep the tag too. You can put it in the ground by the plant, or toss them in a drawer. This way you have a baseline for what works and doesn't.

Put plants where you will see them.
  • Most plants will let you know when they need to be watered, so if you're worried that your thumb is more black than green, place plants in your daily traffic pattern.  
  • You'll be less likely to forget to care for the plant, and more likely to enjoy it. After all that's the point right?

Fertilize your plants
  • Whether you use organic compost, or miracle grow, I won't judge.  The important thing is that plants get hungry and need more than just water.  
  • Starting with good soil helps, and the plant tag will tell you if it has any special fertilizer needs.

Perennials
  • Who doesn't love plants that come back year after year?
  • The cool thing about perennials is that once they are established most require less and less care to look good.

Five of my fav 'plant & forget it' plants:
Info & photos from Dave's Garden Plant Files
  1. Day Lily more info (especially the common ditch lily) 
  2. Mint more info, (boarder line invasive, great for mojitos)
  3. Lantana more info, (comes in lots of colors)
  4. Succulents in general
  5. Confederate Jasmine More info (one of my all time favs)
Related Posts Plugin for WordPress, Blogger...